How to integrate a payment gateway
This step-by-step tutorial is designed to get you started with the core concepts of Duda native eCommerce’s custom payment gateway feature. You will learn how to create an App inside Duda that allows merchants to offer their own gateway.
Prerequisites
To follow along you’ll need:
- Access to the Sandbox Environment
- App Store API Credentials
- An App UUID
- Access to Duda native eCommerce
If you don't have these, please contact [email protected].
1. Setup your Duda app
https://developer.duda.co/docs/app-getting-started
2. Create an account on app installation
When users install your custom payment gateway app on their website, you should create a record containing all the settings, auth details, site_name etc. that you will need to process payments for a website.
3. Create a settings page to link the app account to your merchant payment gateway account
The settings page will allow merchants to connect their merchant accounts to your payment gateway. You can also expose a user interface on this page if you have settings the merchant might want to configure directly in Duda.
4. Register the custom payment gateway to the website
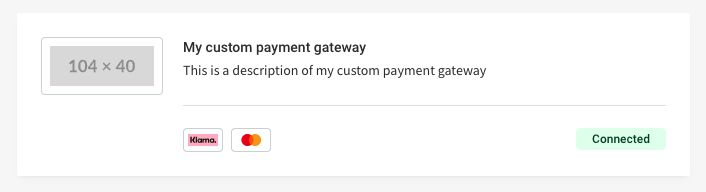
Once the merchant has fully configured his information account and your app is ready to process payments, you will need to register your gateway on the merchant’s website using our Create Payment Gateway API endpoint. Registering your gateway to the merchant’s site will automatically appear as connected in the merchant’s dashboard payment gateway settings page.
curl --request POST \
     --url https://api-sandbox.duda.co/api/integrationhub/application/site/{site_name}/ecommerce/payment-gateways \
     --header 'accept: application/json' \
     --header 'authorization: Basic {app_credentials}' \
     --header 'content-type: application/json' \
     --header 'X-DUDA-ACCESS-TOKEN: {access_token}' \
     --data '
{
  "live_payment_methods_url": "https://example.org/live",
  "test_payment_methods_url": "https://example.org/test",
	"name": "My custom payment gateway",
	"description": "This is a description of my custom payment gateway",
	"image": "https://example.org/image.png",
	"icons": [
		"https://example.org/icon1.png",
		"https://example.prg/icon2.png"
	]
}
'
Our API will return a custom payment gateway object in it’s response. You need to persist the custom payment gateway id in your app account settings record to use later (logging, uninstallment process, etc.).
{
	"id": "cpg_12345"
	"live_payment_methods_url": "https://example.org/live",
  "test_payment_methods_url": "https://example.org/test",
	"name": "My custom payment gateway",
	"description": "This is a description of my custom payment gateway",
	"image": "https://example.org/image.png",
	"icons": [
		"https://example.org/icon1.png",
		"https://example.prg/icon2.png"
	]
}
5. Handle available payment methods for an invoice
Payment lifecycle with a custom payment gateway:
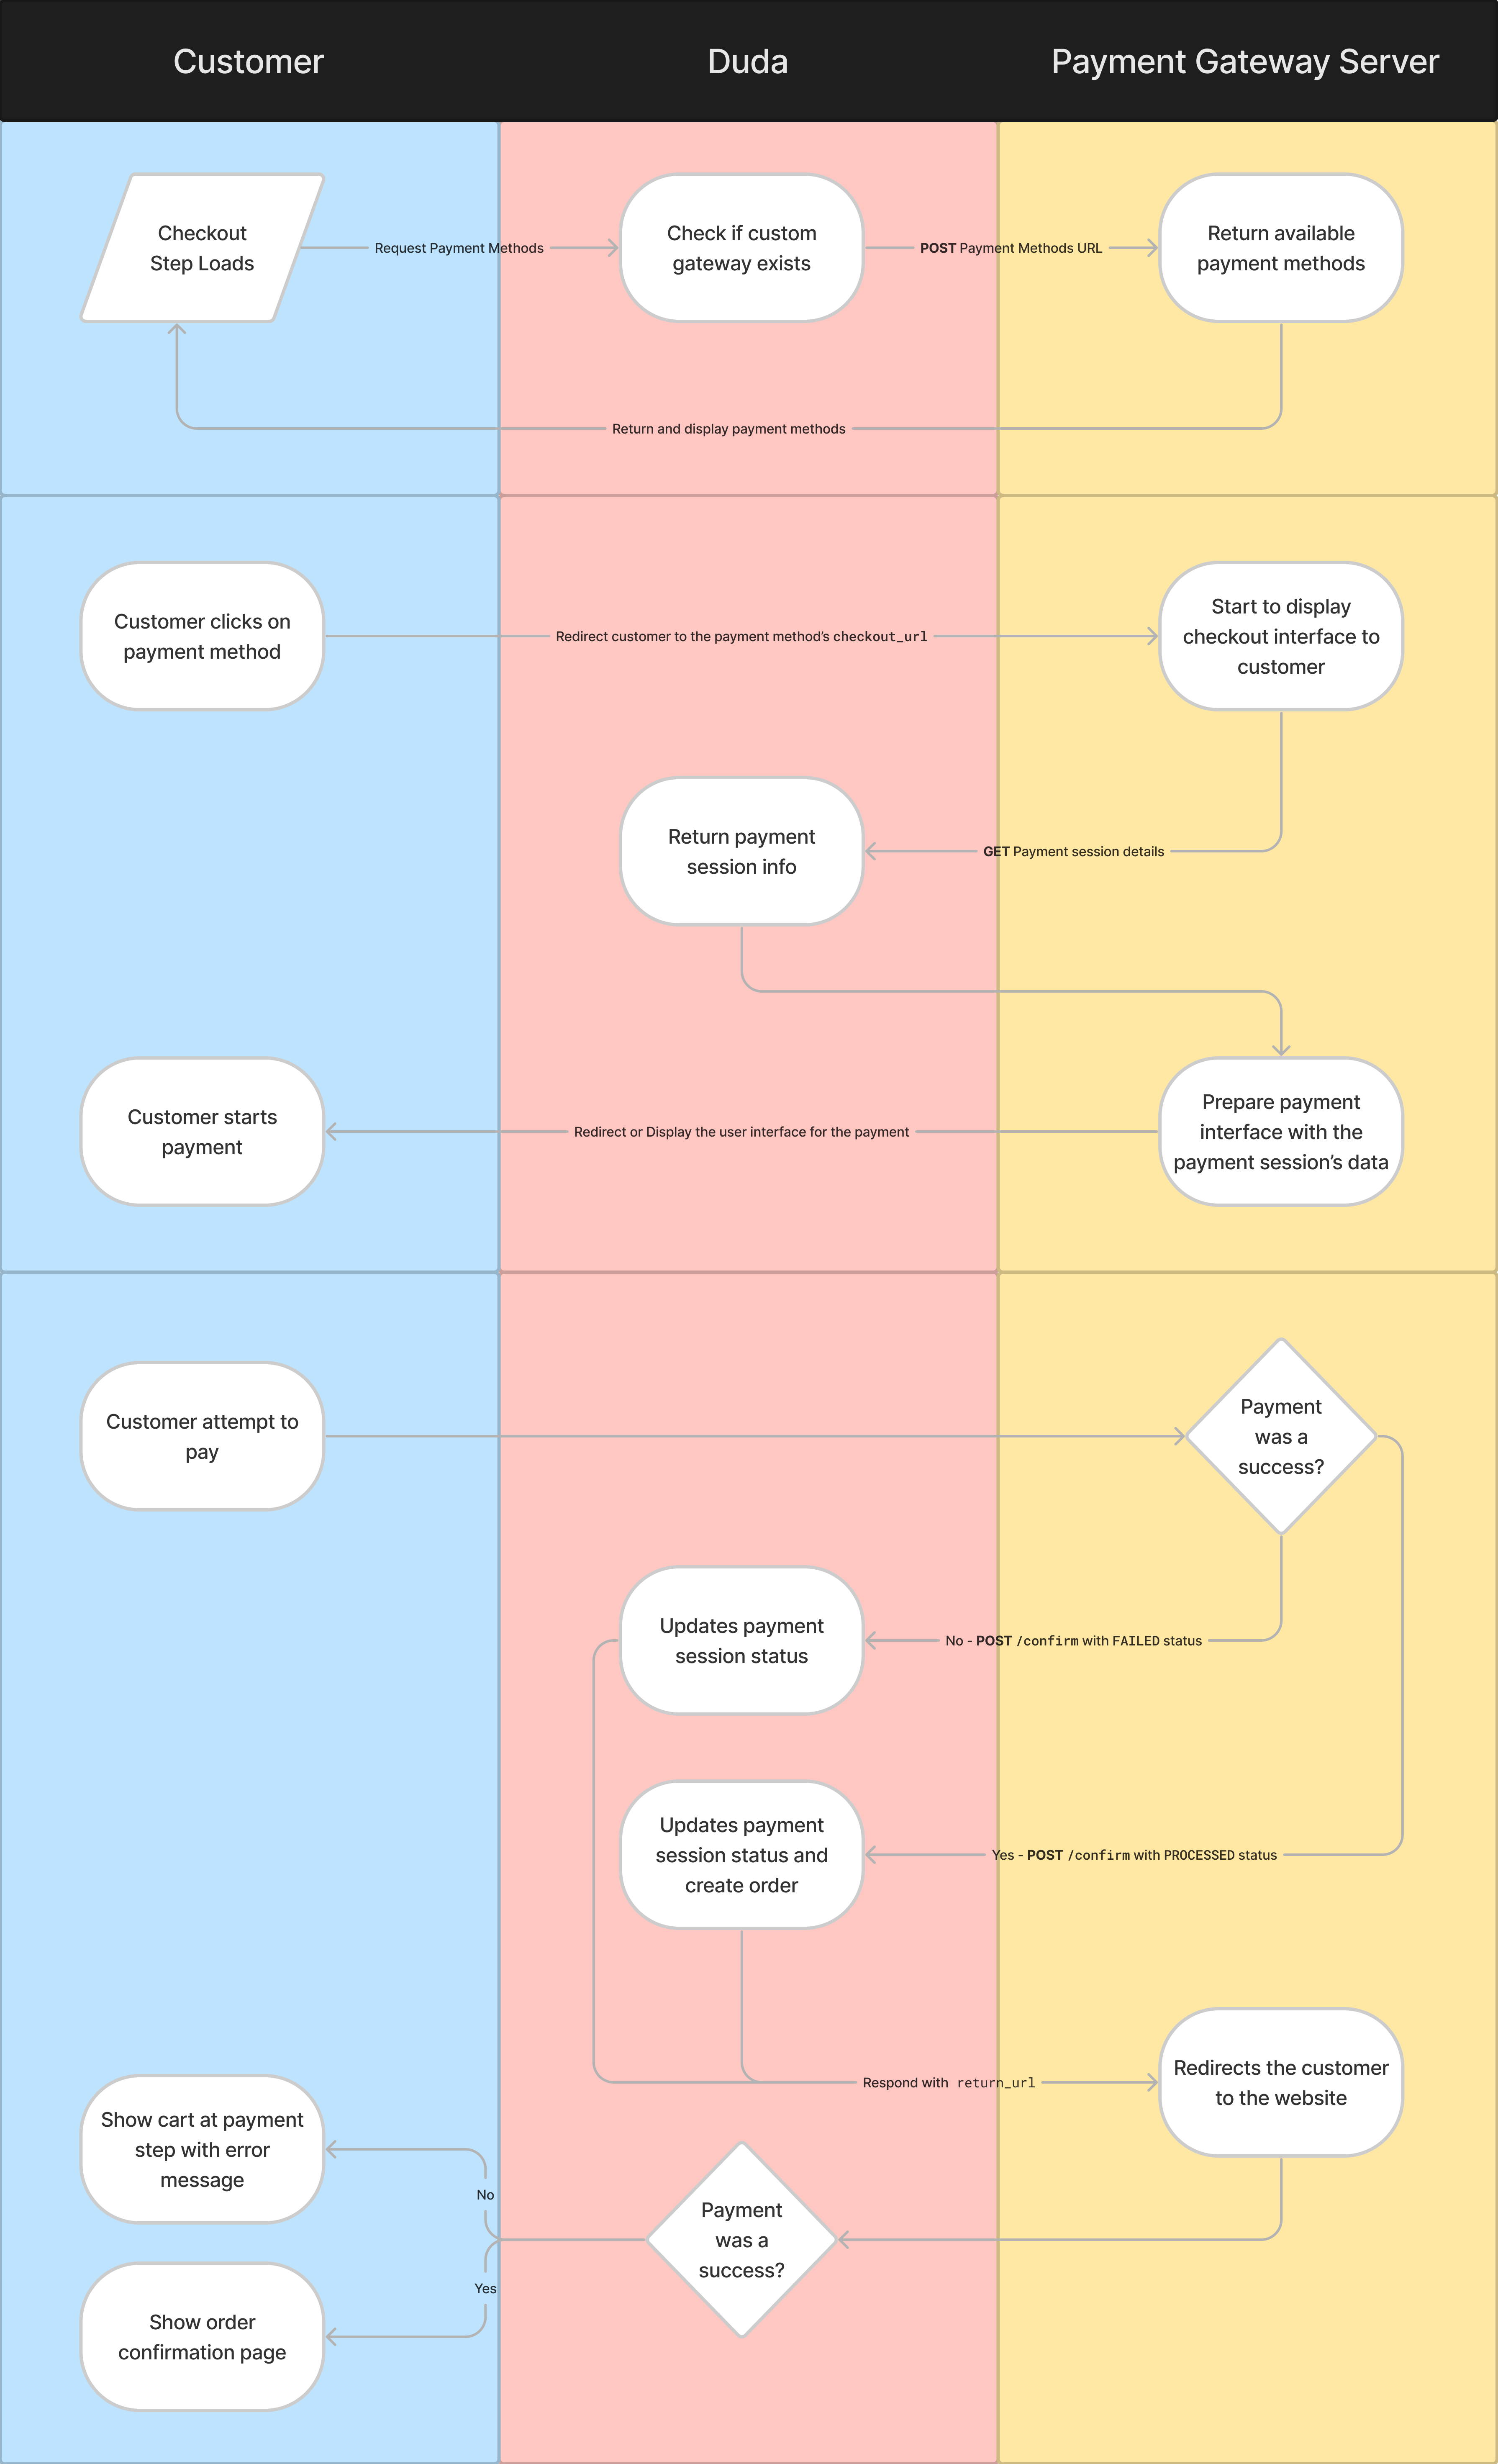
Every time a customer is in the checkout process and is at the payment step, our servers will make a POST request to your live_payment_methods_url or test_payment_methods_url to retrieve your available payment methods.
Validate the payment requestThis step is the best opportunity your app will have to assert that the incoming invoice will be able to process payments. Depending on your gateway’s restrictions, some gateways can have limitations regarding these invoice’s properties:
- Test or Live transactions
- Invoice’s currency
- Invoice’s total amount
- Customer’s billing address
- Merchant’s configuration with your app
- Invoice’s purchase type
- etc.
If you need additional cart information to determine which payment options are relevant to the checkout, you are able to load cart data via the Get Cart endpoint using the
invoice.purchase_idvalue.
You need to respond with an array of payment methods compatible with the customer’s cart, or an empty array if your gateway can’t handle this particular payment. Each payment method can have its own checkout flow, depending on your needs.
| Flow | Description |
|---|---|
| INLINE | The payment form of the custom payment gateway will be embedded in an iframe directly in the checkout payment step. This is the best payment experience possible for customers, and should be prioritized if the payment gateway implemented allows it. |
| REDIRECT | The customers will be redirected to your custom payment page once they click on the “Continue to payment” button. When the flow property is missing from the response, our systems will always default to this scenario. |
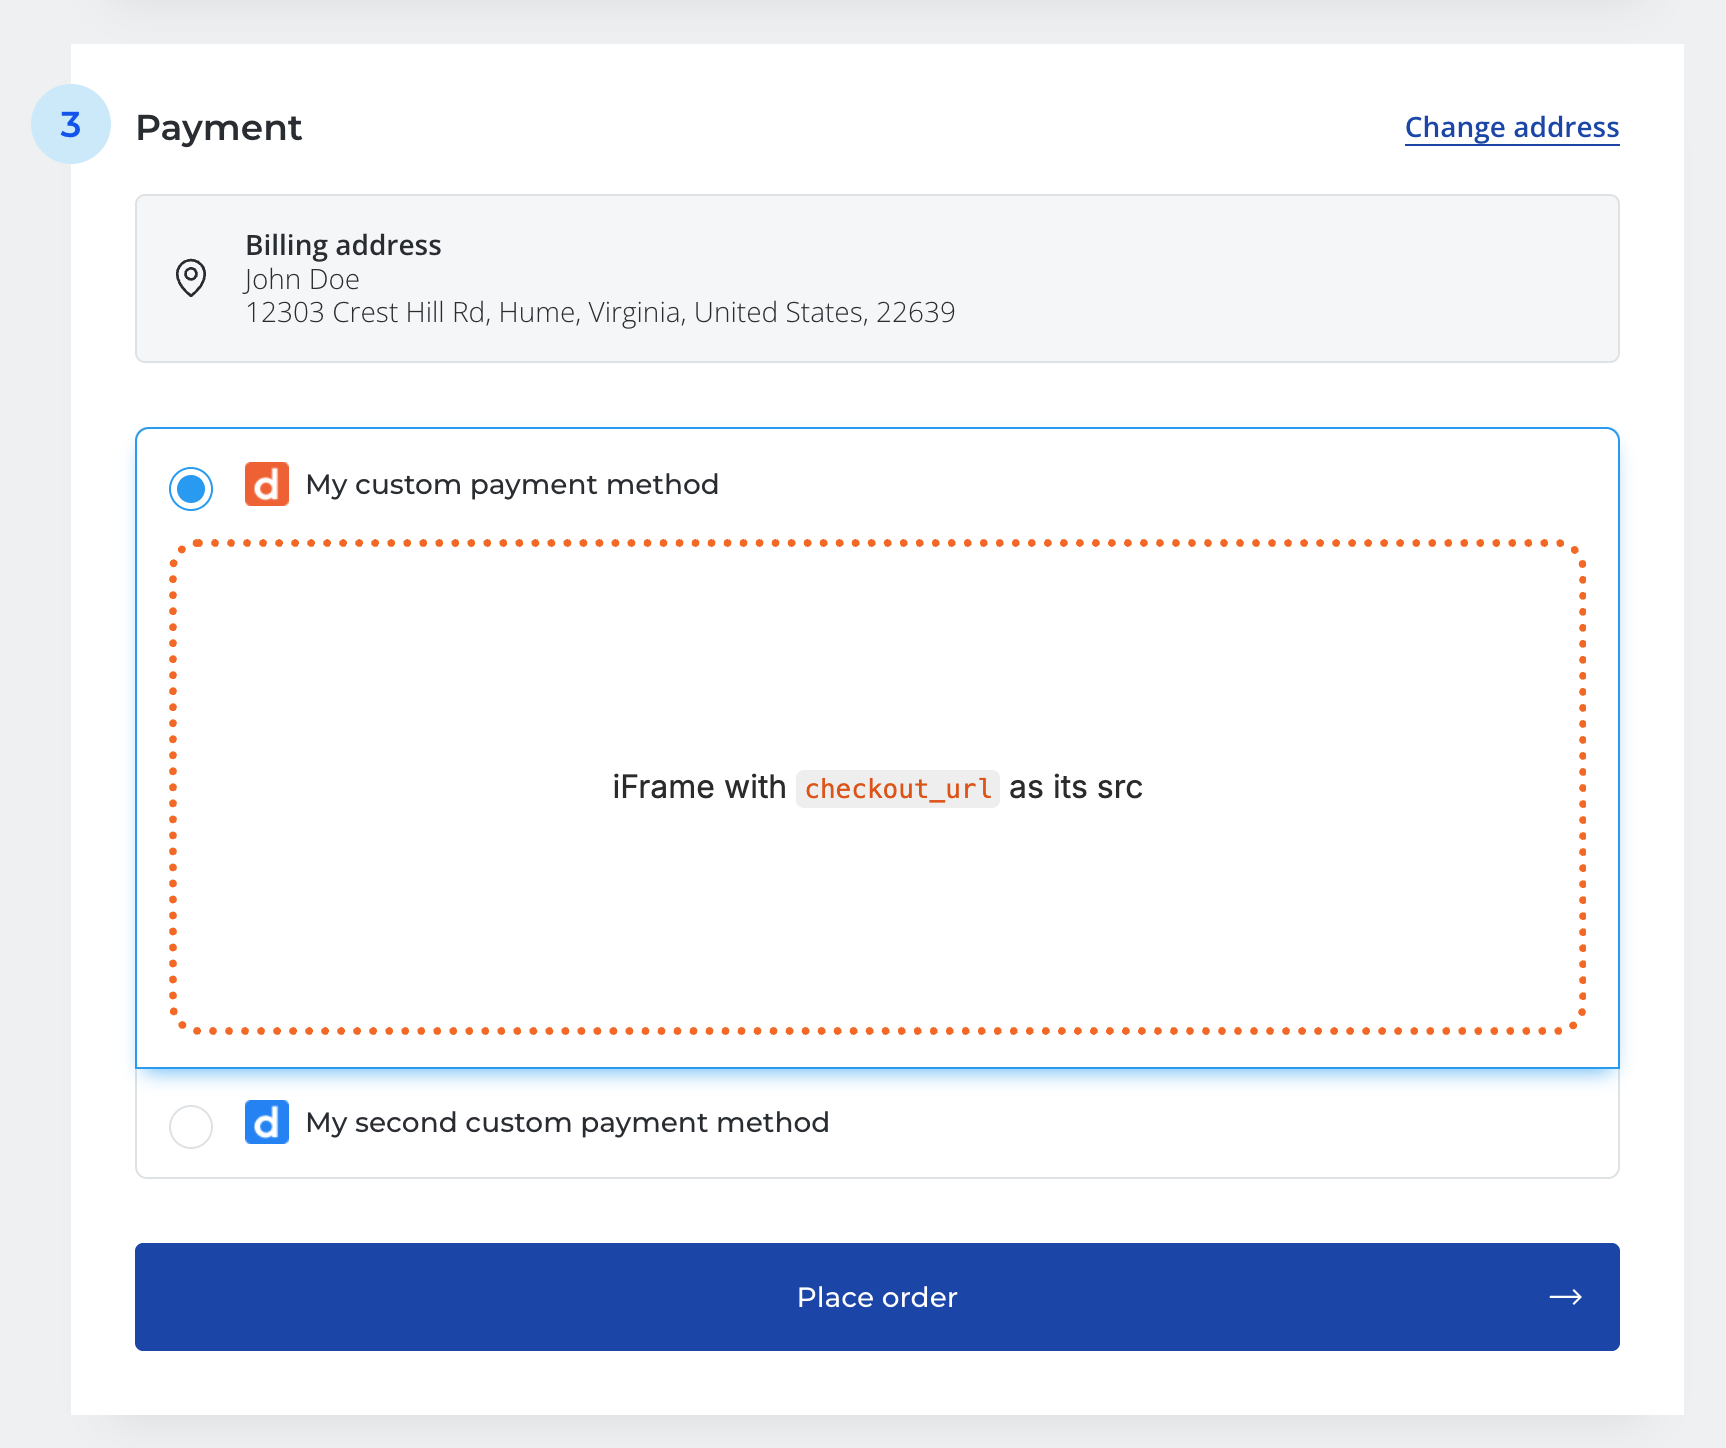
Example of a payment method called “My custom payment method” with a flow set to inline
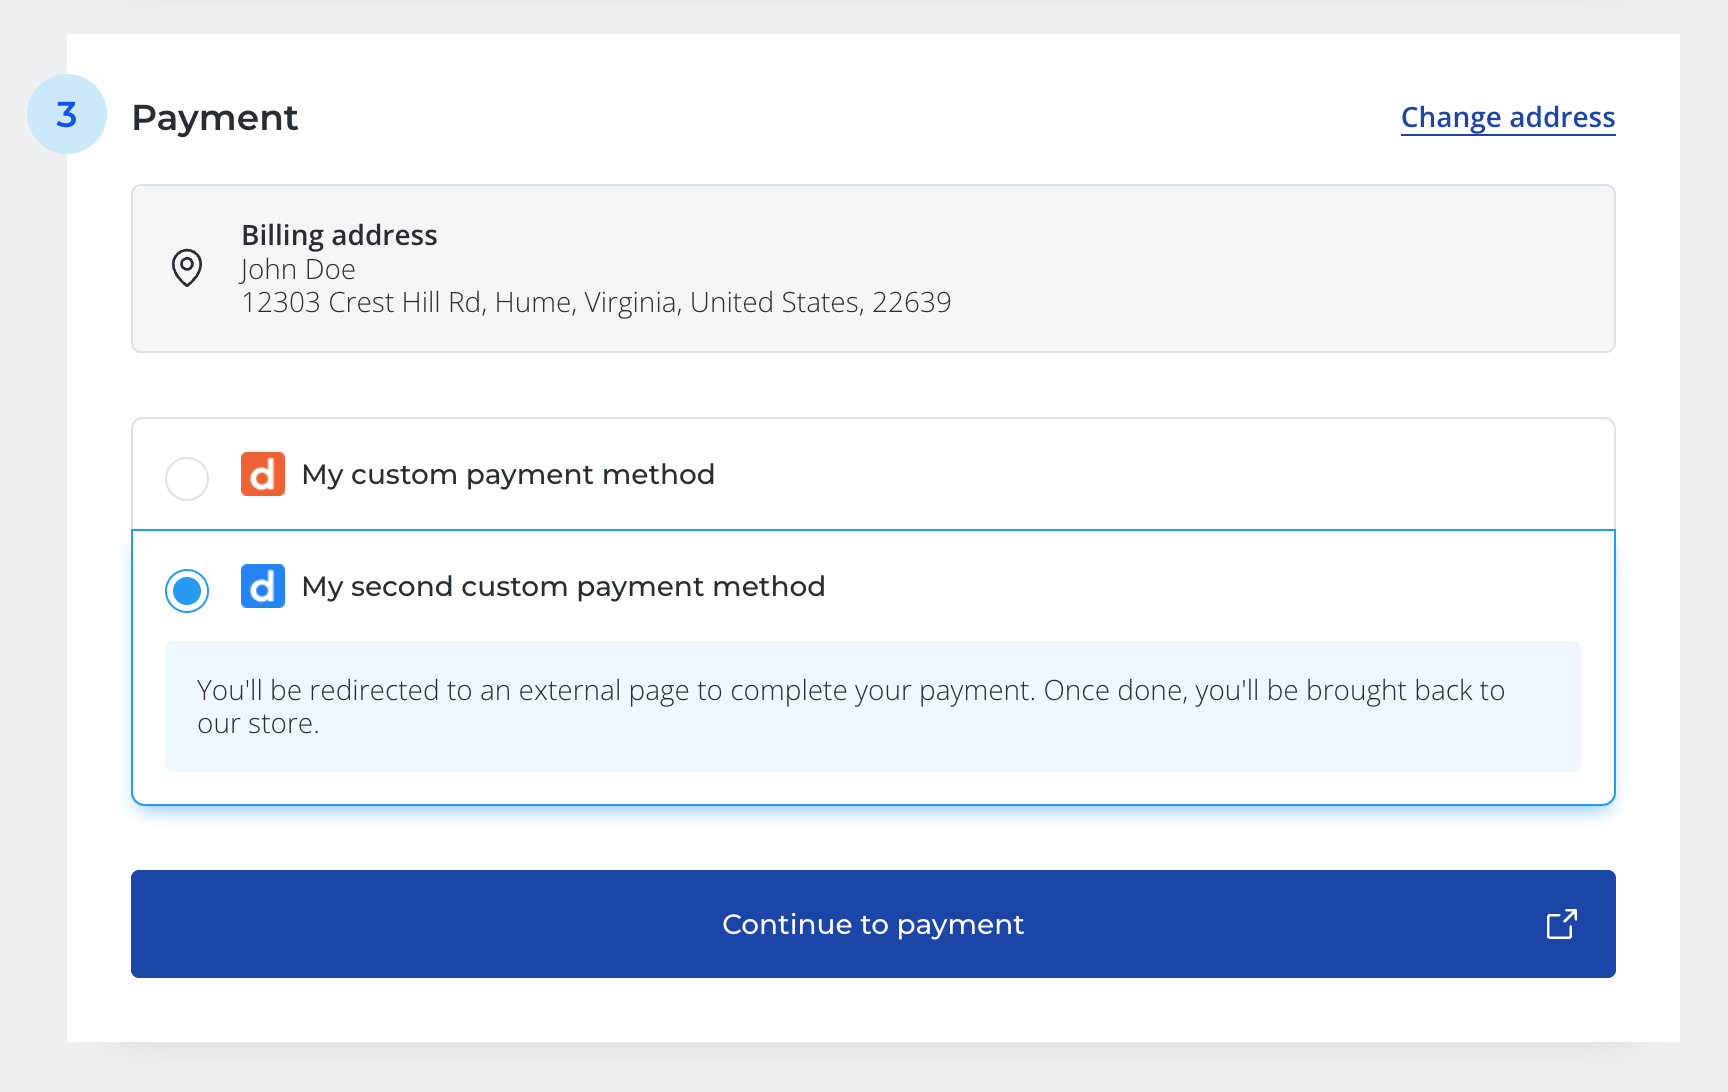
Example of a payment method called “My second custom payment method” with a flow set to REDIRECT
Example POST payload we will send to your live_payment_methods_url or test_payment_methods_url
{
	"mode": "TEST",
	"site_name": "abc123",
	"invoice": {
		"shipping_address": {
			"first_name": "John",
			"last_name": "Doe",
			"full_name": "John Doe",
			"address_1": "577 College Ave.",
			"address_2": null,
			"city": "Palo Alto",
			"region": "CA",
			"country": "US",
			"postal_code": "94306",
			"phone": null,
			"sub_locality": null,
			"street_address": null,
			"street_name": null
		},
		"billing_address": {
			"first_name": "John",
			"last_name": "Doe",
			"full_name": "John Doe",
			"address_1": "577 College Ave.",
			"address_2": null,
			"city": "Palo Alto",
			"region": "CA",
			"country": "US",
			"postal_code": "94306",
			"phone": null,
			"sub_locality": null,
			"street_address": null,
			"street_name": null
		},
		"email": "[email protected]",
		"language": "en",
		"currency": "USD",
		"total": "30.75",
		"purchase_id": "cart_123",
		"purchase_type": "CART"
	}
}
Example payment method response to create the payment methods buttons
[
    {
			"id": "my-custom-payment-method", // unique id between your availaible payment methods
      "name": "My custom payment method", // display name visible to customers",
      "flow": "INLINE",
			"checkout_url": "https://example.org/checkout", // URL to which the customer will get redirected, or the URL that will be iframed depending on the flow property.
			"icon": "https://example.org/icon.png" // (optional) image url to display in our cart next to the checkout button
    },
		{
			"id": "my-second-custom-payment-method",
      "name": "My second custom payment method",
      "flow": "REDIRECT",
			"checkout_url": "https://example.org/alternative-checkout",
			"icon": "https://example.org/alternative-icon.png"
    },
		...
]
6. Handle checkout intent on your hosted payment page
Option A: payment methods with flow set to INLINE
To facilitate communication between the checkout and your gateway integration, please include this mini-SDK in your hosted page that will be iframed. Duda cannot host this SDK due to restrictions in our PCI compliance level.
"use strict";var cpgSDK=(()=>{var l=Object.defineProperty,g=Object.defineProperties,M=Object.getOwnPropertyDescriptor,U=Object.getOwnPropertyDescriptors,D=Object.getOwnPropertyNames,p=Object.getOwnPropertySymbols;var h=Object.prototype.hasOwnProperty,G=Object.prototype.propertyIsEnumerable;var C=(e,t,r)=>t in e?l(e,t,{enumerable:!0,configurable:!0,writable:!0,value:r}):e[t]=r,T=(e,t)=>{for(var r in t||(t={}))h.call(t,r)&&C(e,r,t[r]);if(p)for(var r of p(t))G.call(t,r)&&C(e,r,t[r]);return e},R=(e,t)=>g(e,U(t));var H=(e,t)=>{for(var r in t)l(e,r,{get:t[r],enumerable:!0})},b=(e,t,r,o)=>{if(t&&typeof t=="object"||typeof t=="function")for(let i of D(t))!h.call(e,i)&&i!==r&&l(e,i,{get:()=>t[i],enumerable:!(o=M(t,i))||o.enumerable});return e};var q=e=>b(l({},"__esModule",{value:!0}),e);var u=(e,t,r)=>new Promise((o,i)=>{var s=m=>{try{d(r.next(m))}catch(I){i(I)}},f=m=>{try{d(r.throw(m))}catch(I){i(I)}},d=m=>m.done?o(m.value):Promise.resolve(m.value).then(s,f);d((r=r.apply(e,t)).next())});var x={};H(x,{init:()=>v,initRequireAuthentication:()=>O});var c="_DM_CPG_SDK_",E=(o=>(o.INIT_END=`${c}init_end`,o.COMPLETE_START=`${c}complete_start`,o.REQUIRE_AUTHENTICATION_END=`${c}require_authentication_end`,o))(E||{}),n=(s=>(s.RESIZE=`${c}resize`,s.INIT_START=`${c}init_start`,s.COMPLETE_END=`${c}complete_callback_end`,s.REQUIRE_AUTHENTICATION_START=`${c}require_authentication_start`,s[s.REQUIRE_AUTHENTICATION_END=E.REQUIRE_AUTHENTICATION_END]="REQUIRE_AUTHENTICATION_END",s))(n||{}),a=(e,t)=>{let r={action:e,data:t};window.parent.postMessage(r,"*")};var w,_=e=>{w(e)},A=(e,t)=>u(void 0,null,function*(){let r=yield e(R(T({},t),{requireAuthentication:o=>u(void 0,null,function*(){if(!o)return a(n.REQUIRE_AUTHENTICATION_START,{url:o}),Promise.resolve({success:!0,errorMessage:void 0});let i;try{i=new URL(o)}catch(s){throw new Error("[CPG SDK] A valid HTTPS URL is required to trigger the 3DS authentication process")}if(i.protocol!=="https:")throw new Error("[CPG SDK] The URL must be a valid HTTPS URL");return new Promise(s=>{w=s,a(n.REQUIRE_AUTHENTICATION_START,{url:o})})})}));if(!r.success&&!r.errorMessage)throw new Error("[CPG SDK] The complete callback method must return a success or error message");a(n.COMPLETE_END,r)});var P=e=>{a(n.RESIZE,e!=null?e:window.document.body.scrollHeight)};var N=(e,t)=>{if(!t)throw new Error("[CPG SDK] The CPG SDK has not been initialized yet");t(R(T({},e),{resize:P}))};function O(){return u(this,null,function*(){return{complete:e=>u(this,null,function*(){if(!e.success&&!e.errorMessage)throw new Error("[CPG SDK] The require authentication callback method must return a success or error message");a(n.REQUIRE_AUTHENTICATION_END,e)})}})}var S;function v(e){return u(this,null,function*(){if(!e&&typeof e!="function")throw new Error("[CPG SDK] The complete callback method is required to initialize the SDK");return new ResizeObserver(()=>{a(n.RESIZE,window.document.body.scrollHeight)}).observe(document.body),window.addEventListener("message",r=>{let o=r.data;if(!(!o.action||!o.action.startsWith(c)))switch(o.action){case E.INIT_END:N(o.data,S);break;case E.COMPLETE_START:A(e,o.data);break;case E.REQUIRE_AUTHENTICATION_END:_(o.data);break;default:throw new Error(`[CPG SDK] Unknown message action: ${o.action}`)}}),a(n.INIT_START),yield new Promise(r=>{S=r})})}return q(x);})();Initialize the mini-SDK
Once your webpage containing the checkout payment form is ready, initialize the SDK using the window.cpgSDK.init() method.
Note that init() must be called with a complete method as an argument. This complete method will be executed by our checkout once the customer clicks on the Continue to payment button, and our checkout process is ready to authorize the payment.
Your complete method is responsible for orchestrating the payment with the integrated gateway, synchronizing the payment session state via your backend server using our /confirm endpoint (see step 7), and providing feedback to the customer in the checkout when a payment is successful or not.
Your complete method must return a result object to the checkout.
// Success
const onComplete = async () => {
	return {
		success: true
	};
};

// Failure
const onComplete = async () => {
	return {
		success: false,
		errorMessage: "The payment was declined by your bank, please try again."
	};
};<!DOCTYPE html>
<html lang="en">
<head>
<title>Custom CPG inline checkout flow</title>
</head>
<body>
<div>
... my payment form goes here
</div>
<script>
let cpg;
const onComplete = async (context) => {
// Step 1. (optional) Validate the payment form
//
// If it is not valid, return success: false to display feedback
// faster to the customer
if (!isPaymentFormValid()) {
return {
success: false,
errorMessage: "The credit card number is invalid"
};
}
// Step 2. Authorize and capture the payment.
//
// Implement your own code here to process the payment.
//
// After authorization, synchronize the state of the payment session via
// your backend using the /confirm endpoint (https://developer.duda.co/reference/ecommerce-confirm-payment) to mark
// the cart payment as PROCESSED, FAILED, or PENDING, depending on
// your use case (see step 7).
const result = await doPayment();
// Step 3. (optional) Require additional authentication from
// the customer.
//
// If your gateway requests a 3DS challenge or any other 2FA authentication
// to complete a payment, you can re-enable the payment form using the
// context.requireAuthentication() method.
context.requireAuthentication();
// Step 4. Return a result object to the checkout.
//
// If the payment was not successful, return a result object to the checkout
// with a clear error message to display to the customer.
if (!result.success) {
return {
success: false,
errorMessage: result.errorMessage
};
}
// If the payment was successful, return a result object to the checkout.
// The checkout will then display the thank you page to the customer.
return {
success: true
};
};
const init = async () => {
// Step 1. Initialize your payment gateway
await myGateway.init();
// Step 2. Initialize the cpgSDK to enable communication between
// the checkout and your custom payment gateway
cpg = await window.cpgSDK.init(onComplete);
// If your payment form requires more height in the checkout at any time
// after initialization, you can call the cpg.resize method with the
// desired height.
cpg.resize(280);
};
init();
</script>
</body>
</html>Option B: payment methods with flow set to REDIRECT
When the customer has selected your payment method in the checkout, we will redirect them to your checkout_url with session_id and site_name query string parameters appended to your provided checkout_url.
With these two parameters, you will be able to retrieve the customer’s payment session by making this API call using our Get Payment Session endpoint.
Once the customer is on your external checkout, the rest of the payment sequence is up to you. Generally, this is where you collect the customer's payment information and process the charge through the payment gateway platform you integrate.
curl --request GET \
     --url https://api-sandbox.duda.co/api/integrationhub/application/site/{site_name}/ecommerce/payment-sessions/{session_id} \
     --header 'accept: application/json' \
     --header 'authorization: Basic {app_credentials}' \
--header 'X-DUDA-ACCESS-TOKEN: {access_token}'{
"id": "123",
"mode": "LIVE",
"cancel_url": "https://example.org/#checkout",
"invoice": {
"purchase_id": "123456",
"purchase_type": "CART",
"email": "[email protected]",
"language": "en",
"currency": "CAD",
"total": "20.00",
"shipping_address": {
"first_name": "John",
"last_name": "Doe",
"full_name": "John Doe",
"address_1": "577 College Ave.",
"address_2": null,
"city": "Palo Alto",
"region": "CA",
"country": "US",
"postal_code": "94306",
"phone": null,
"sub_locality": null,
"street_address": null,
"street_name": null
},
"billing_address": {
"first_name": "John",
"last_name": "Doe",
"full_name": "John Doe",
"address_1": "577 College Ave.",
"address_2": null,
"city": "Palo Alto",
"region": "CA",
"country": "US",
"postal_code": "94306",
"phone": null,
"sub_locality": null,
"street_address": null,
"street_name": null
}
}
}
Validate payment gateway can perform transactionIf you made validations on step 5 that the invoice can be processed by your gateway, these checks should be done before displaying the payment form too.
In the very unlikely case a customer would be redirected to your checkout page, you should update the payment session with an error state (see step #7). You will then be able to redirect the user to our checkout page with a clear message indicating that the payment cannot be processed.
If you need additional cart information to validate payment, you are able to load cart data via the Get Cart endpoint using the
invoice.purchase_idvalue.
Return to cart best practicesYour user interface should include a return to cart button if your customers want to go back and edit their carts, or cancel the payment. This button should use the
cancel_urlin the payment session retrieval. This url will automatically re-open the cart for the customer once the redirection is complete.
7. Confirm the payment session with your payment result
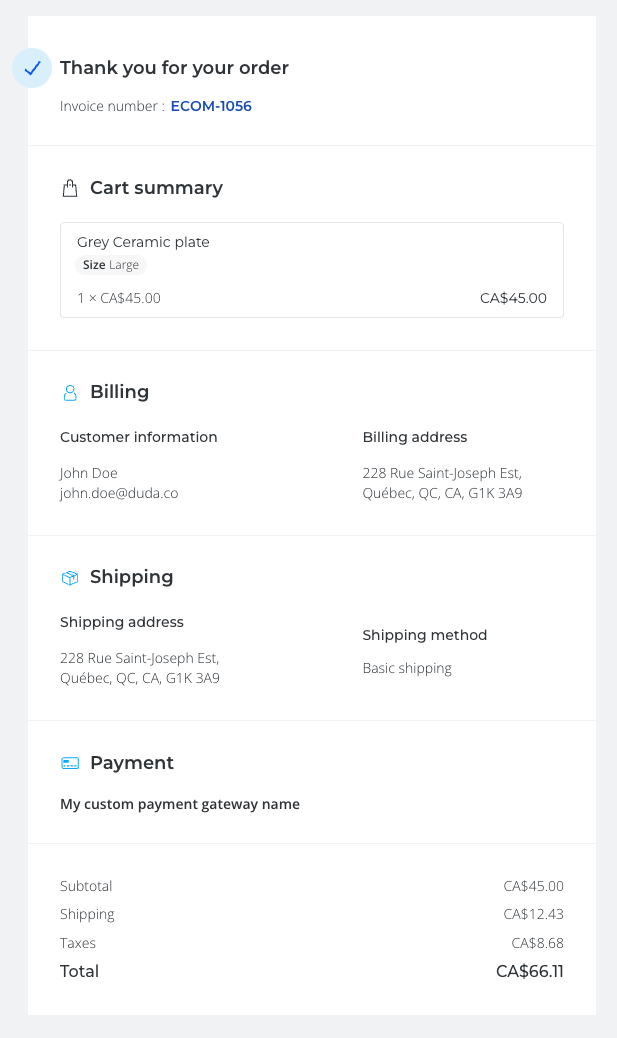
Once the payment is made, successful or not, your app will need to update the payment session with its result. This update will trigger the order creation in the merchant’s dashboard, and redirect the user to the order confirmation page or it will redirect the customer to the checkout page with the error message you specified in the payment session update.
Example of a successful payment:
curl --request POST \
     --url https://api-sandbox.duda.co/api/integrationhub/application/site/{site_name}/ecommerce/payment-sessions/{payment_session_id}/confirm \
     --header 'accept: application/json' \
     --header 'authorization: Basic {app_credentials}' \
     --header 'content-type: application/json' \
     --header 'X-DUDA-ACCESS-TOKEN: {access_token}' \
     --data '
{
  "state": "PROCESSED",
	"transaction_id": "my-unique-transaction-id",
	"name": "My custom payment gateway name",
	"icon": "https://example.org/my-gateway-logo.png",
	"instructions": "Optional string to display extra instructions to your customers",
	"links": {
		"refunds": null
	}
}
'{
"return_url": "https://redirect.multiscreensite.com/..."
}
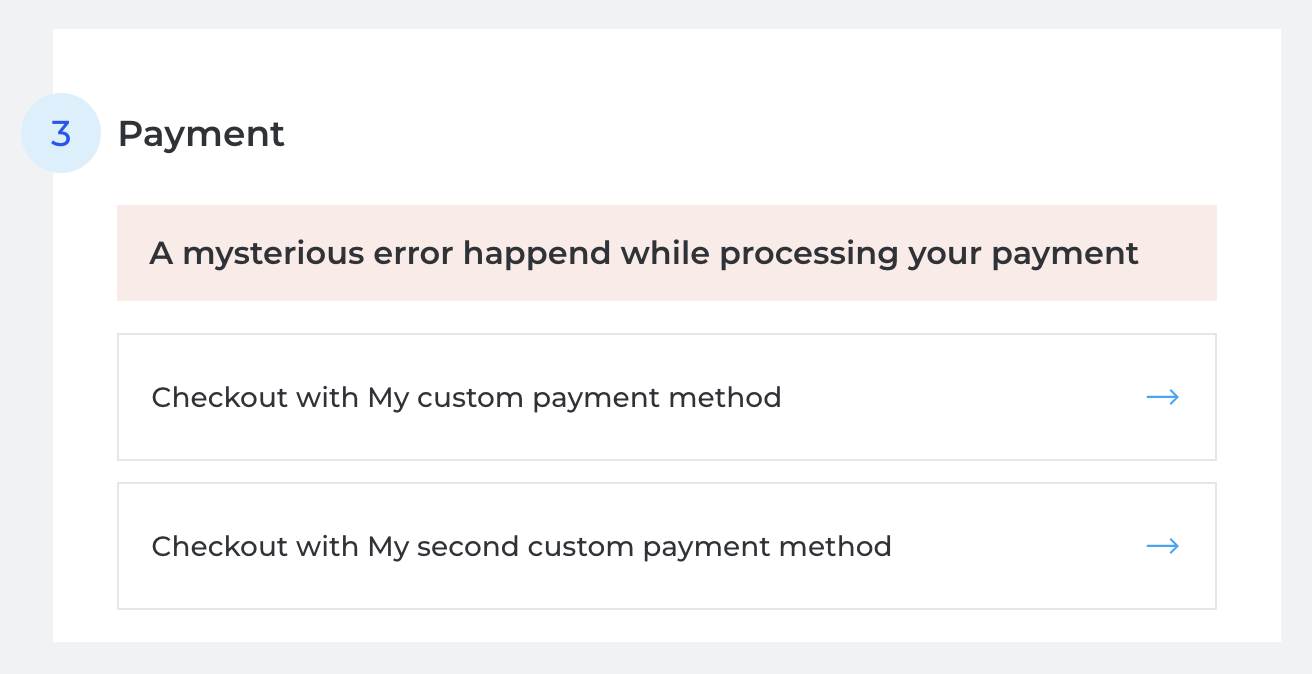
Example of a failed payment:
curl --request POST \
     --url https://api-sandbox.duda.co/api/integrationhub/application/site/{site_name}/ecommerce/payment-sessions/{payment_session_id}/confirm \
     --header 'accept: application/json' \
     --header 'authorization: Basic {app_credentials}' \
     --header 'content-type: application/json' \
     --header 'X-DUDA-ACCESS-TOKEN: {access_token}' \
     --data '
{
  "state":"FAILED",
	"error": {
		"code": "my-unique-error-message-code",
		"message": "A mysterious error happend while processing your payment"
	}
}
'{
"return_url": "https:://redirect.multiscreensite.com/..."
}
8. Handling refunds
Flow of a refund on an order passed with a custom payment gateway. Note that this flow is fully synchronous.
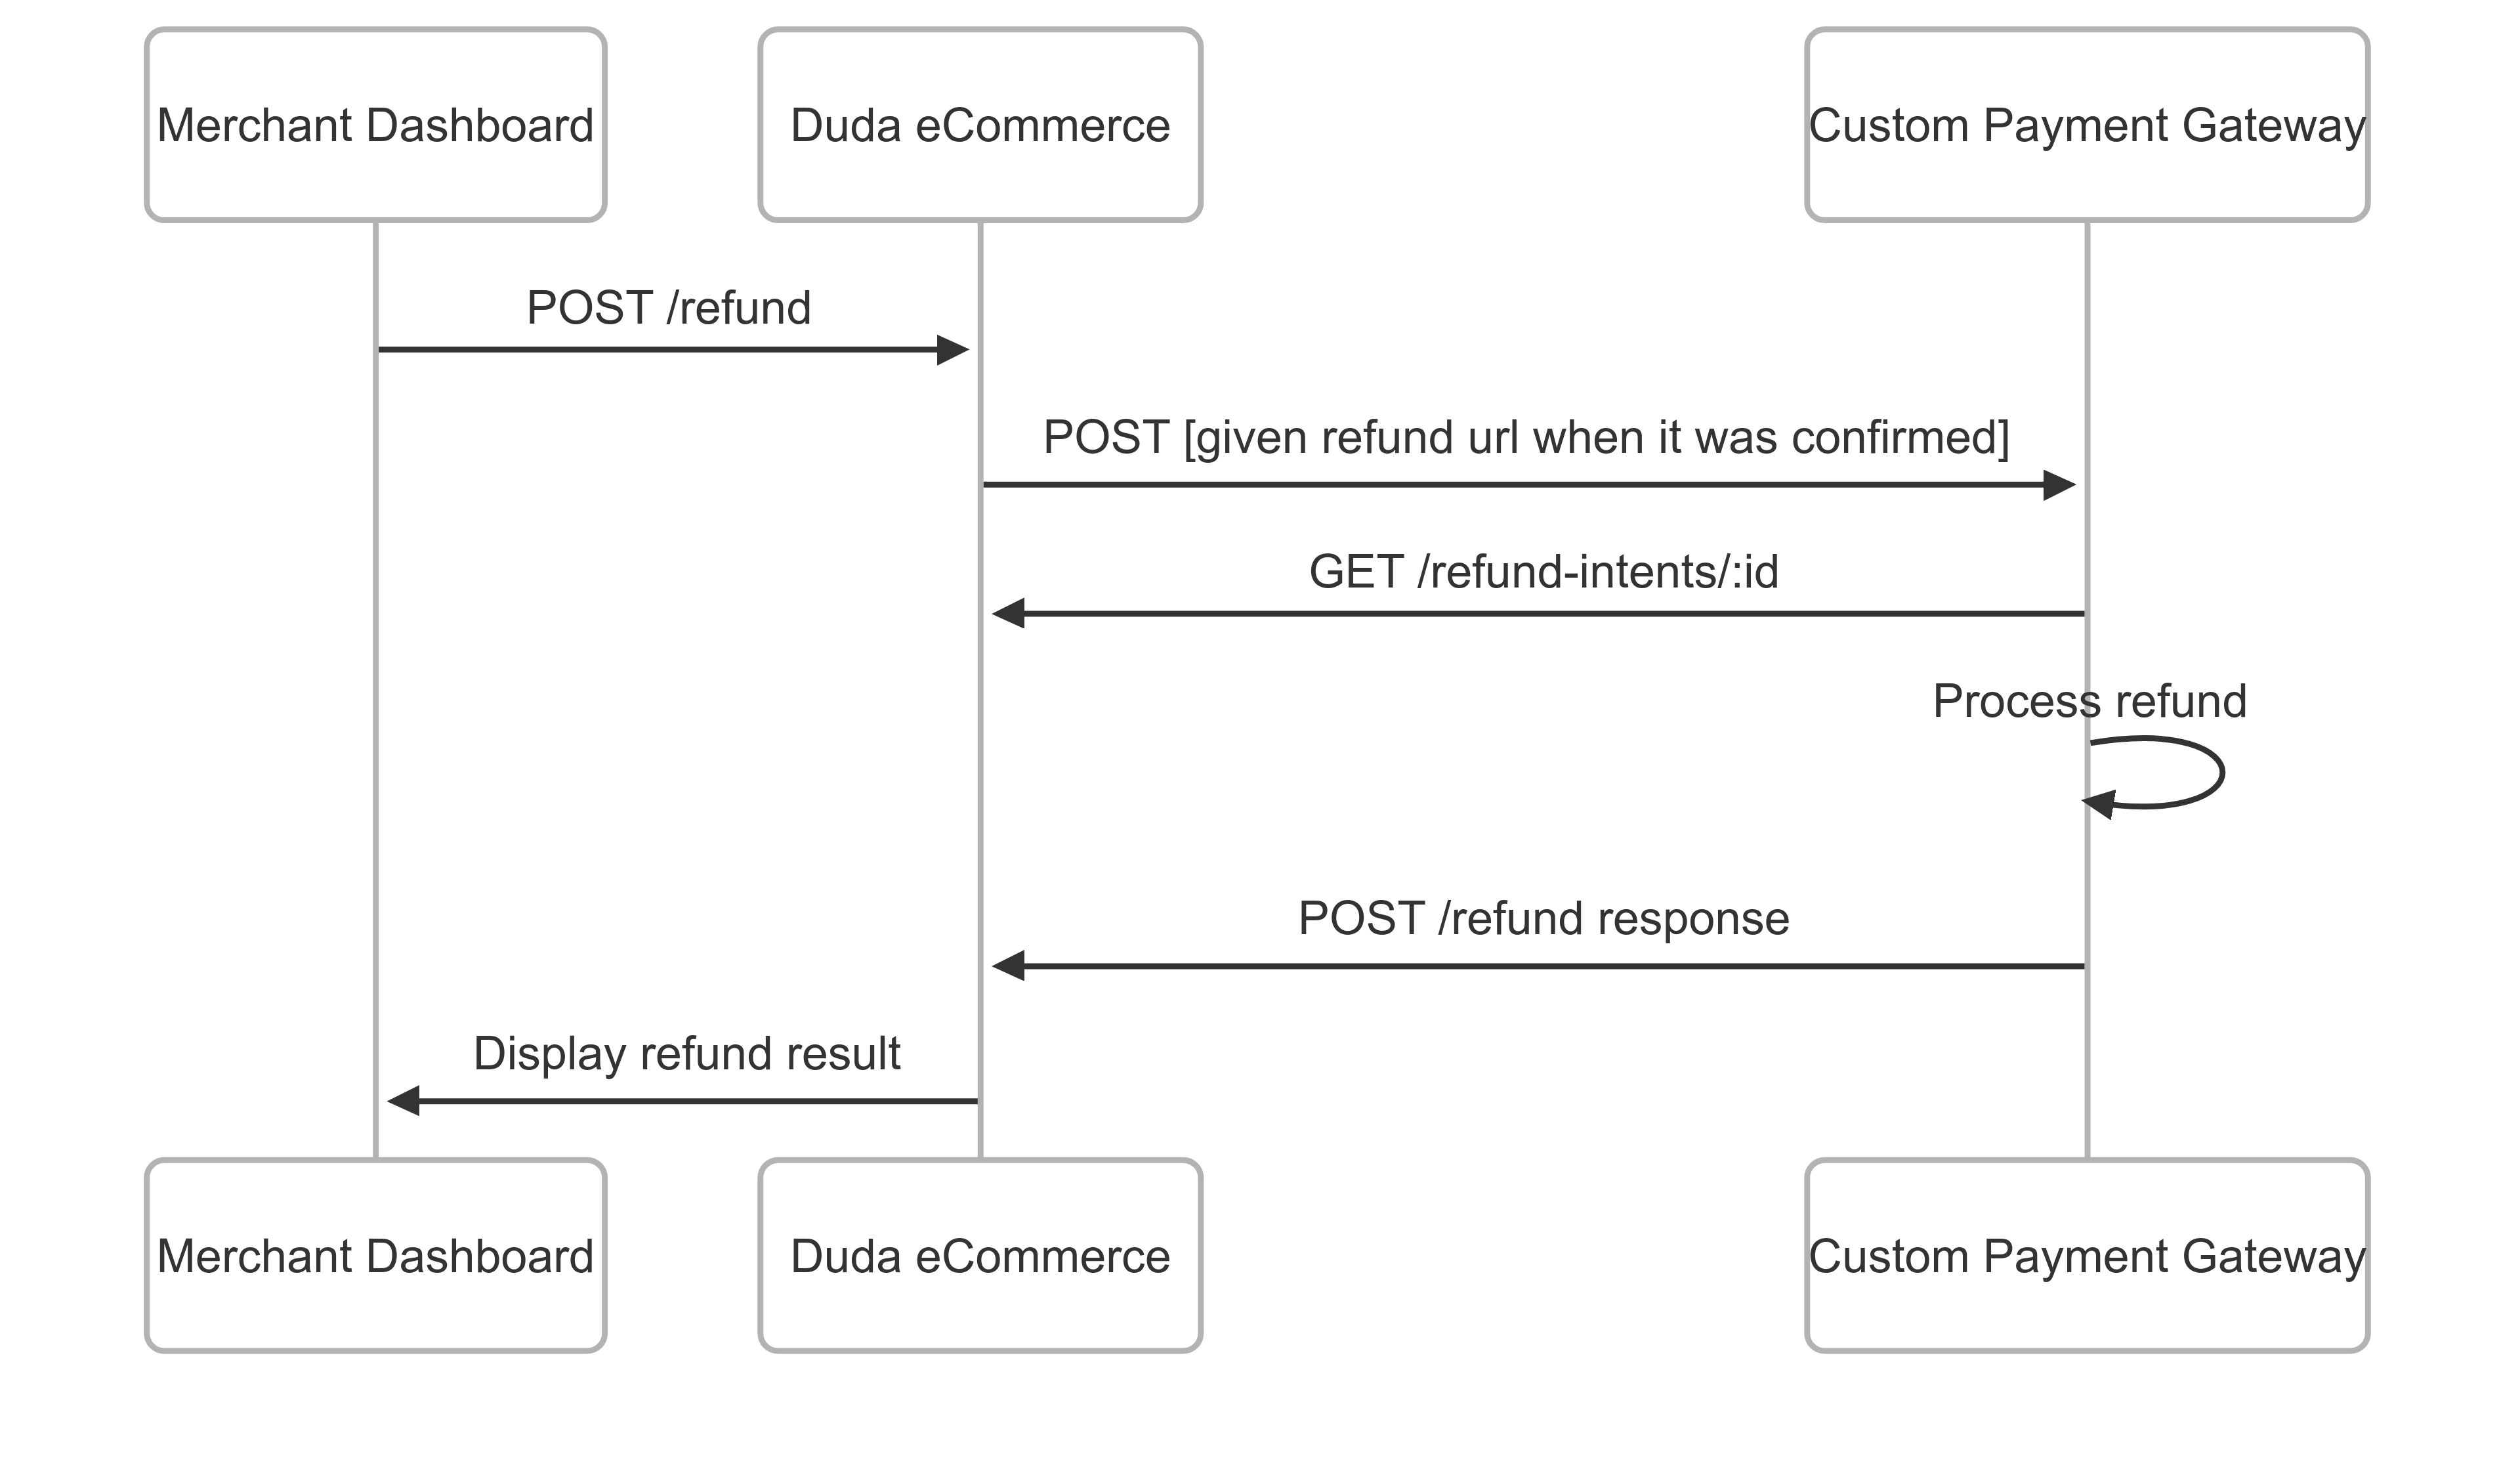
If a refund is issued from the store admin, Duda checks whether the payment is refundable by making a POST request to the refund URL provided by the custom payment gateway. This URL must be specified in the links.refunds property of the Confirm Payment Session API call made at the time of purchase. If the confirm payment request does not include a refund URL, any refunds initiated from the merchant dashboard will only update the order status to “refunded” within Duda — no actual refund transaction will be processed through the payment gateway. The merchant dashboard clearly indicates this behavior to avoid confusion.
Below is the structure of the payload for that POST request made to the refunds URL:
{
  "refund_intent_id": "ri_123",
  "site_name": "12345"
}
A refund intent is created just before a refund is officially recorded on an order. Its sole purpose is to provide your custom payment gateway with all the necessary data to complete the refund transaction.
To retrieve the refund intent, use the refund_intent_id and site_name to call Duda’s Get Refund Intent endpoint. The response will contain all the information your gateway needs to process the refund.
Below is the structure of the refund intent response:
{
  "id": "ri_123",
  "mode": "LIVE", // or TEST
  "purchase_id": "order_12345",
  "purchase_type": "ORDER",
  "original_transaction_id": "abc123", // the transaction id the custom payment gateway returned us at the original payment
  "reason": "The customer said it was the wrong size for them.", // nullable since the reason field is optional
  "items": [ // list of all line items affected by this refund
    {
      "id": "12345", // id of the line item refunded
      "type": "PHYSICAL", // DIGITAL | TAX | SHIPPING
      "quantity": 1.25, // decimal, since fixed amount refund will issue a pro-rata refund across all line items
      "amount": "9.00"
    }
  ],
  "currency": "CAD", // ISO currency code
  "total": "11.25", // amount to refund
}
After communicating with your custom payment gateway, the refund intent is destroyed, and an actual refund may be created depending on the response from the refund URL.
Below are the structures of the successful and unsuccessful responses:
{
  "state": "PROCESSED",
  "transaction_id": "refund-1234" // identifier from the C.P.G. of the refund transaction
}{
"state": "FAILED"
}9. Unregister the payment gateway
If a merchant wants to remove your payment gateway, the app will need to remove its gateway registration from the specific website. When the merchant uninstall the app, our servers will make a HTTP call to the uninstallation_endpoint specified in the app manifest. The call to this URL should trigger the deletion of the payment gateway on the website.
curl --request DELETE \
     --url https://api-sandbox.duda.co/api/integrationhub/application/site/{site_name}/ecommerce/payment-gateways/{gateway_id} \
     --header 'accept: application/json' \
     --header 'authorization: Basic {app_credentials}' \
     --header 'content-type: application/json' \
     --header 'X-DUDA-ACCESS-TOKEN: {access_token}'
Updated 4 months ago